Sewing, knitting, machine embroidery, and crafting by whim and request.
Jessica Harlow
email: occasionalfancyjh@yahoo.com
Facebook
Instagram
Ravelry
Knit Blog
My knitches and I had a conversation about yarn overs one night because one of them was ending up with twisted stitches, so we were explaining to her how she had to reverse her yarn overs on the purl side to avoid it. While explaining yarn overs, my idea of what was over the needle vs what was under was completely different from my co-helper. My (flawed) orientation was different than hers and then she explained her perspective to me and it made a big difference. When she was learning to crochet, the book she learned from told her to hold her crochet hook horizontally and pretend it was a branch that a bird was standing on top of. The yarn over would always go where the bird sits first and she always applied this to knitting needles too. So I said, “that means, in knitting, the yarn over would need to go under the branch where a bat would hang when you purl.” So when knitting stockinette, I knit bat and purl bird – common for continental pickers. If you have twisted stitches, you are likely knitting and purling both the same (bat/bat or bird/bird) and should switch one to eliminate the twists. So which are you? Bat/bird, or bird/bat?
If that wasn’t enough, the way you yarn over makes a difference in whether a brioche pattern will work for you or not! How does the bird/bat or bat/bird situation apply to brioche? Well, if you’ve had problems with the wrong color ending up crossed in front of a stitch, it could be your yarn over battling the instructions you’ve been given.
When I learned to brioche – from the Purl Soho website – the instructions were yo, sl1 which worked just fine for me (remember I’m a bat/bird). When trying an Andrea Mowry pattern which calls for a sl1, yo, my friends and I couldn’t make it work. The wrong color always crossed the color that was supposed to be dominant. I tested a few rows and discovered that if you are a bat/bird, you should ALWAYS use a yo, sl1 rather than the reverse. If you’re a bird/bat, you should ALWAYS use a sl1, yo. So if you’re having problems with one, switch to the other – both ways are correct depending on the knitter.
Will this fix all your brioche problems? Maybe, maybe not. The way you insert the needle into your stitches may also be a factor in why you could be having problems, but I haven’t tested that yet. . . .
Happy knitting to you!
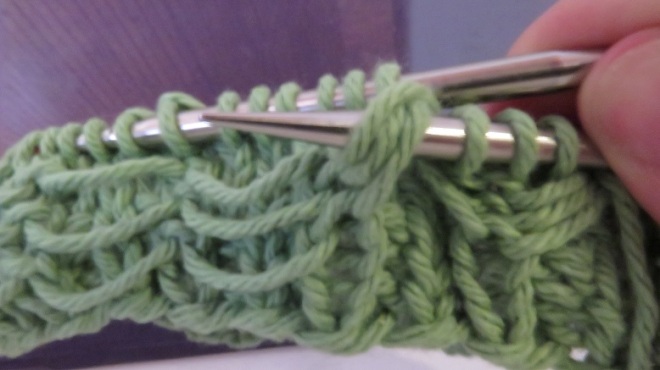
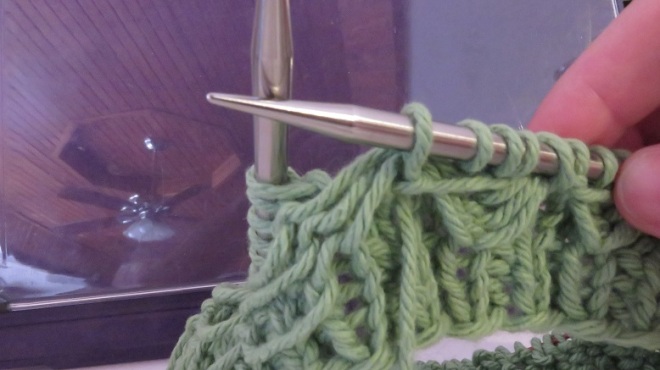
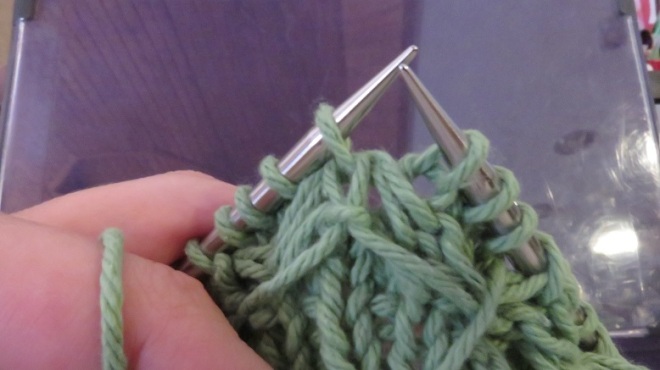
This stitch pattern for Sweet Someyeh and Lovely Lili can be complicated to read, so I made up this picture tutorial. I hope it helps. I am also working on a video of each stitch for those who are still lost on the stitch instructions. Details to come and I’ll post it right here at the beginning when it’s ready.
We’re going to start with what the piece looks like after the SPS rows:

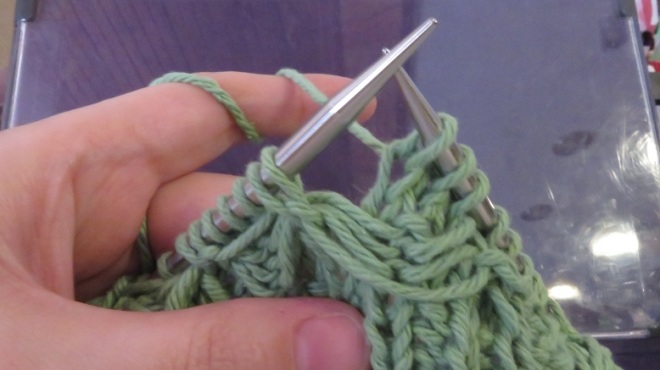
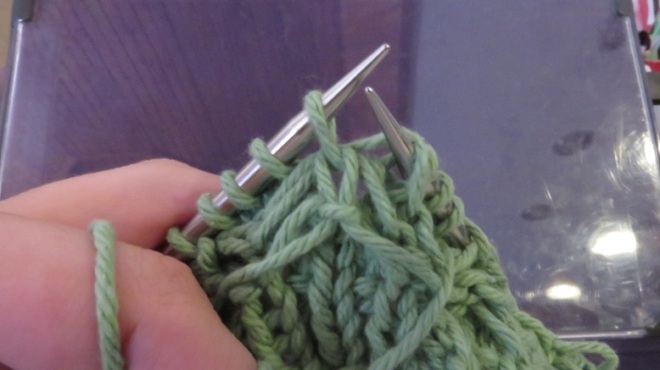
First up is bb3p:
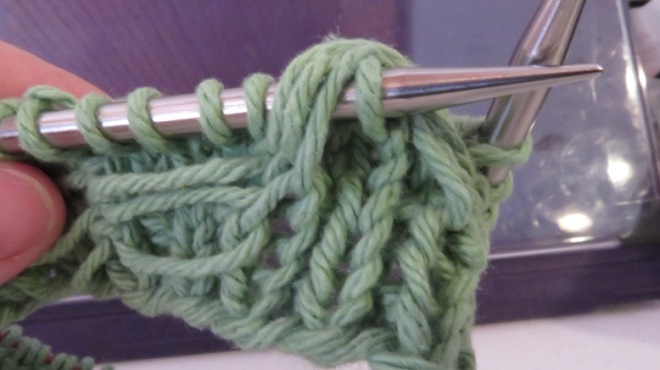
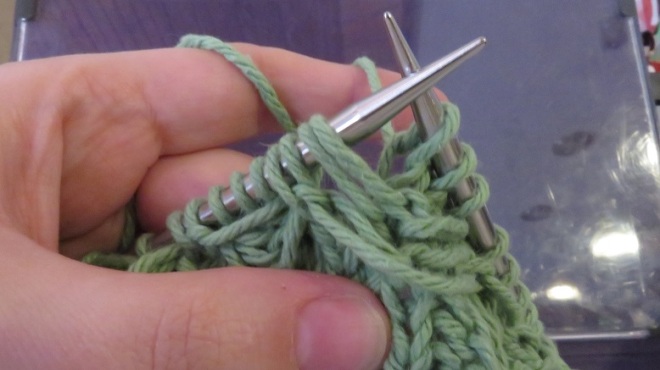
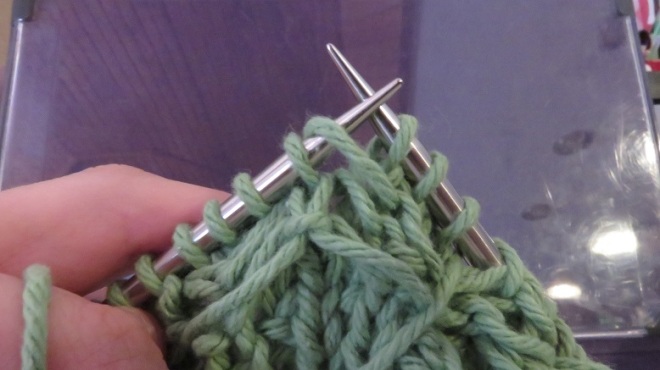
Next is bb2k:

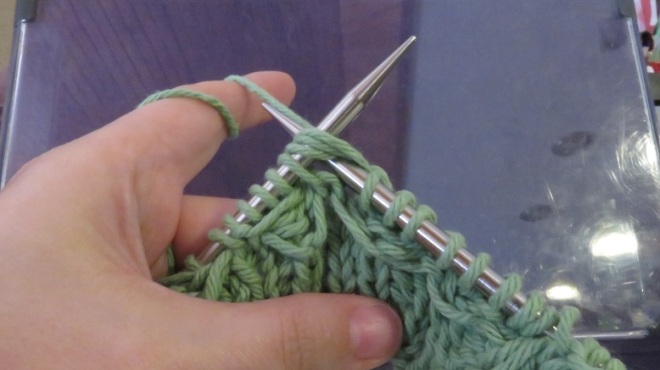

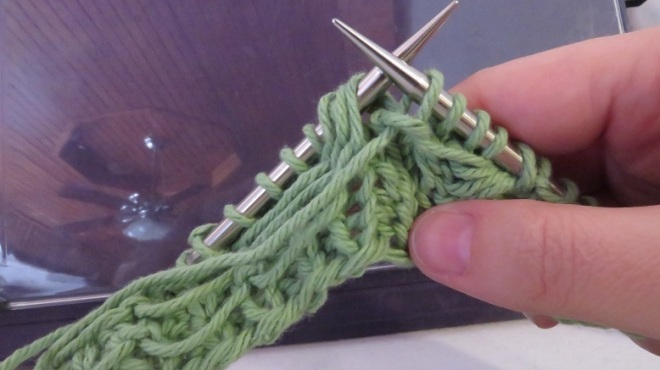
And finally, bb1p:
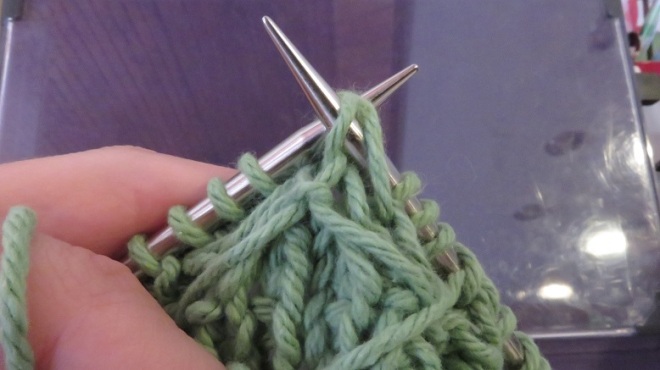
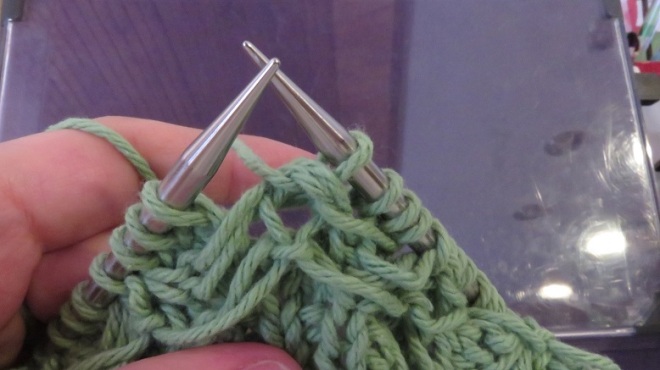
So then, this is what the knitting looks like so far! Have faith! It takes the WHOLE 12 rows for it to start looking right. I hope this has helped! Happy knitting to you!


")
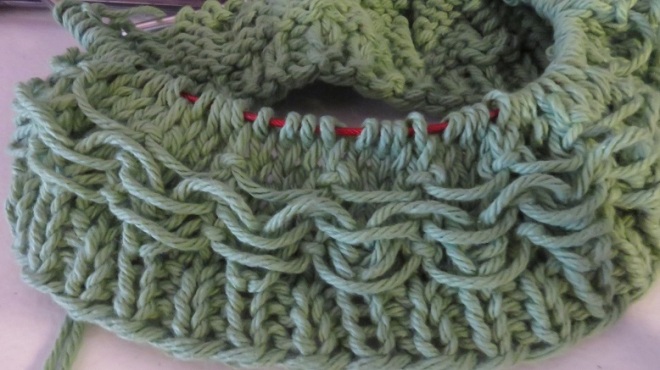
My friends and I decided to do a knit along so they could learn 2 color brioche (I had previously knitted an awesome super-mega-ultra scarf in brioche to teach myself). We decided on an easy hat pattern in the round, but also wanted to practice first. After teaching them a few rounds of flat brioche, we made the decision that I would create a scarf pattern for them instead. Brioche in the flat is mostly about keeping track of what color side you’re on (this will become clearer later) – and I had solved this problem in my head.
I headed home and cast on the project and THEN realized that we could do the hat because brioche in the round is actually easier than brioche in the flat, because you’re only working on one color side, so . But in solving the problem, in flat brioche, of remembering which color side you’re on, I also figured out a way to ease into the motion of it as well as an ease to remembering what color side you’re on to help you remember whether your knitting or purling with one color or the other. So here’s the “Baby Steps to Flat Brioche” pattern.
Finished measurements: 13in x 65in or 8in x 65in
Supplies: 2 colors of worsted yarn (360yds), #8 (5mm) & #15 (10mm) 16″ circular needles (MUST BOTH BE CIRCULAR), yarn needle for weaving in ends.
Gauge (4″x4″): 16sts x 21rows stockinette on #8 (5mm) needles
Glossary:
sl1: slip 1 stitch – all slipped stitches will be as if to purl.
wyib = with yarn in back
wyif = with yarn in front
brk = knit next st and yo together
brp = purl next st and yo together
HELPFUL NOTES:
On color side A, color A will ALWAYS be knit (double knitting) or brk (brioche) while color B will always be purled (double knitting) or brp (brioche).
On color side B, color B will ALWAYS be knit (double knitting) or brk (brioche), while color A will always be purled (double knitting) or brp (brioche).
CAST ON: Using color A, size 15(10mm) needles, loosely cast on 49 stitches (31sts for 8inch width). (This is row 1A – future rows in the double knitting sections will coordinate with their letters: 1A=color A, 1B=color B)
WITHOUT TURNING, slide all stitches to the other side of the needle. (I’m gonna call this the Electric Slide from now on just for fun)
BEGIN DOUBLE KNITTING (BDK for the first knitting section, single stranded, back and forth) *fun fact: if at the end of this section, you have managed not to cross yarns at the beginnings of each row, you’ll have nifty pockets to put your hands in! If not, no big deal – I didn’t make it 😅*
Row BDK-1B: (sl1 wyib, p1) to last stitch, sl1 wyib.
NOW turn work! (From now on known as Put yo’ thang down FLIP IT and reverse it!)
Row BDK-2A: (k1, sl1 wyif) to last stitch, k1.
Electric slide!
Row BDK-2B: (sl1 wyif, k1) to last stitch, sl1 wyif.
Put yo’ thang down FLIP IT and reverse it!
Row BDK-3A: (p1, sl1 wyib) to last stitch, p1.
Electric Slide!
Row BDK-3B: (sl1 wyib, p1) to last stitch, sl1 wyib.
Put yo’ thang down FLIP IT and reverse it!
Repeat rows BDK-2A thru BDK-3B six more times, then BDK-2A&B once more – ending on color side B. There should be 14 rows total on each side (not counting the color A row on color side B).
HELP!: In these first rows, you have established a color A side of fabric and a color B side of fabric. While working this entire pattern, you will always begin with color A no matter which color side you’re on.
So, I have 2 working yarns on one side, which color should I start with? Color A.
So I have 1 working yarn on each side, which yarn do I need to do to finish the row? Color B.
Okay, enough of this double knitting! Let’s get to the brioche already!
A bit of silliness: You can think of brioche knitting as a kind of battle of colors. After row (battle) xA, color A wins! The pattern on the needles will be AAB, AAB, AAB to the end. So now is the time for color B’s counter attack! After row (battle) xB, color B wins! The pattern on the needles will be BAB, BAB, BAB to the end. And at the VERY end, the third party ~YOU~ win the war! 😂 (wow, that escalated fast – baby steps and dancing to all-out-war)
BEGIN BRIOCHE SECTION: (rows known as BBS) Now we’ll add the yarn overs and k2togs/p2togs that creates the brioche fabric. YAY!
SWITCH to #8(5mm) needles.
Even with the needle size change, I discovered that we need to decrease the stitch count by 2 stitches to keep the fabric even. So:
Row BBS-1A: Sl1 as if to knit, sl2 (one color A, one color B) as if to knit, transfer all 3 stitches back to holding needle (correcting the twist on the middle – color A stitch), k2tog, sl2 wyif, k1, (YOS, k1), to last 4 stitches, sl1, sl2 through the back loop (as if you were gonna p2tog) , transfer 3 stitches back to holding needle (correcting the twist on color A stitch), sl2 wyif, SSK.
Electric slide!
Row BBS-1B: YOS, p2tog tbl, (YOS, BRP) to last 3 stitches, p2tog, YOS.
Put yo’ thang down FLIP IT and reverse it!
Row BBS-2A: (brp, YOS) to last stitch, brp.
Electric slide!
Row BBS-2B: (YOS, brk) to last stitch, YOS.2
Put yo’ thang down FLIP IT and reverse it!
Row BBS-3A: (brk, YOS) to last stitch, brk.
Electric slide!
Row BBS-3B: (YOS, brp) to last stitch, YOS.
Put yo’ thang down FLIP IT and reverse it!
Repeat rows BBS-2A thru BBS-3B until piece reaches 60″, then BBS-2A&B once more.
FINISH IT!

Change to #15 (10mm) needles.
In the first row of this Final Double Knit (FDK) section we’ll add back the decreased stitches and finish off the scarf.
Row FDK-1A: BRK, sl1 wyif, yo, (BRK, sl1 wyif) to last 2 sts, yo, sl1 wyif, BRK.
Row FDK-1B: sl1, p1 (without yo), sl1 wyib, yo, (sl1 wyib, p1) to last 4 sts, sl1 wyib, yo, sl1 wyib, p1, sl1.
Row FDK-2A: (k1, sl1 wyib) to last stitch, k1.
Row FDK-2B: (sl1 wyif, k1) to last stitch, sl1 wyif.
Row FDK-3A: (k1, sl1 wyif) to last stitch, k1.
Row FDK-3B: (sl1 wyib, p1) to last stitch, sl1 wyib.
Repeat rows FDK-2A thru FDK-3B six more times, then FDK-2A&B once more – ending on color side B.
Bind off with color A – in this instance, a little bit tight is better than loose. Weave in ends.
HURRAY YOU WON THE WAR! Now you have a super warm and cozy brioche scarf to brag about!
I completely overhauled the pattern twice and frogged many, many times (adding purple, taking away purple, adding purple back again). I finally figured out the magic of pi in creating a half circle shawl (which is extra necessary since I couldn’t find any half circle patterns that were bottom up to help me figure out the ratio of decreases). Maybe I’ll write a tutorial in the future so others can be helped. Long tutorial short, you need to decrease by 3.14 inches for every inch of the radius.

Next up was how in the world to block a shawl without a blocking frame or blocking mats! It took me a few days to figure this out. I have an extra thick yoga mat, but 24 inches still wasn’t enough space. So I looked at my crafting surface and thought “if I only had the entire corner covered by yoga mat, I could put it on there diagonally and it would be perfect! But my second yoga mat isn’t the same thickness. (womp! womp! womp!)
So. School is starting soon for my 4 boys. (I promise this is relevant, just give it a minute) I have one going to middle school (6th), a 3rd grader, a 2nd grader, and a Kindergartner. How in the world has my youngest one gotten to school age already? I still have no idea what the heck I’m going to do with his nap mat from last year (which happens to be an extra thick yoga mat). Maybe I should give it to his preschool teacher from last year. . . . .

Wait, W H A T?! I have another yoga mat to make the blocking corner!! WOOHOO!! So I just put the shawl in the wool wash (which for me is the washing machine on wool setting) and will be blocking tonight! YAY!
That means pictures soon – although it’s supposed to rain a lot in the next week, so I’m not sure if we’ll get the sunshine necessary to take great pictures. (womp! womp! womp!)
So. . . . I’ll get back to you again soon, hopefully with the announcement of the shawl pattern being uploaded to Ravelry (and possibly Etsy). Happy crafting!!
Well I could say I’ve “well begun” this shawl creation, but I definitely can’t say it’s half done. I think I may have named it already, but I’m not going to reveal that in the minuscule chance that someone happens upon this blog and steals the name for something they’re creating. It does have to do with hearts though!


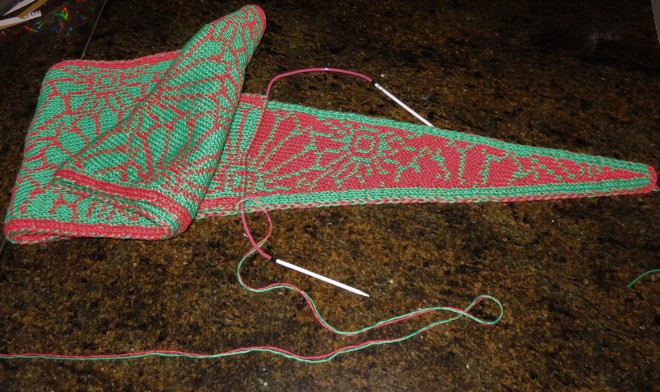
It’s ALMOST done!! Getting so close. Colorwork = annoying. This was my first double knitting colorwork project. Prior to this I’d only ever done one other colorwork project. Pain in the butt. I’ll probably be sticking to lace and textures from now on, unless I find something I REALLY want to do. I’m on the last chart. I think I can. I think I can. Chugga-choo-choo.
My first shawl pattern has been put on hold because the needles I need to use are already in a long term project. I need a second set!! I use interchangeables, and can’t afford another set at the moment, so I guess I’ll have a while to think about it and create it in my head before I actually start. Meanwhile, look at this pretty photo my dad took!
After getting the perfect heart chart figured out, I then needed to figure out just how to create the shawl the way I wanted. This means math. Lots of math. I worked up one of the hearts in a triangle (of course I forgot to take a picture ![]() ) so I could figure out measurements of each segment that will later make up the shawl, how many segments I’d need to make it as big as I want it, gauge of the yarn, and lots of other little details.
) so I could figure out measurements of each segment that will later make up the shawl, how many segments I’d need to make it as big as I want it, gauge of the yarn, and lots of other little details.
Of course I COULD just do trial and error, but that’s not my style and I find it wears on some yarns so I prefer not to torture my medium. That’s why I calculate everything to be confident it’s going to work out at least mostly to design (I like to have a little wiggle room).
So each triangle is going to become somewhat of a wedge – think of a bunch of men’s neckties sewn together to form a semi-circle. That’s what I’m going for. Now, I’d LIKE this to be a large shawl, but I have a feeling my yarn is only going to go so far. It will probably end up half the size I want it to be and I’ll need to recalculate. Not particularly looking forward to that! Maybe I should start smaller. This would all probably be so much easier if I could just do it top down instead of bottom up. Oh the trouble these hearts (and my determination) have caused!
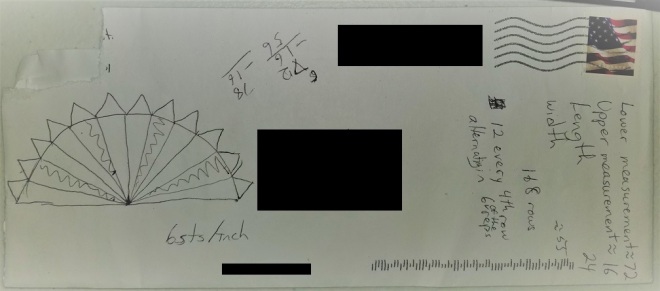
Anyway, had to figure out how long the bottom curve was to be since I am working bottom up. Guess what that means? Trigonometry. Really. I didn’t even get to that level in college! This is where determination comes in again – don’t ask me why it comes up for stuff like this when my house is a mess and I’m lazy in almost every other aspect of life.
So I go searching first for names for parts of a circle since my last geometry class was freshman year of high school and I can’t remember anything other than pi, radius, diameter and a few of the calculations relating to those. Searching helps me find that I’m looking for measurement of the arc and only have the measurement of the chord and rise. It took me a few tries, but I finally got around to finding the following picture: 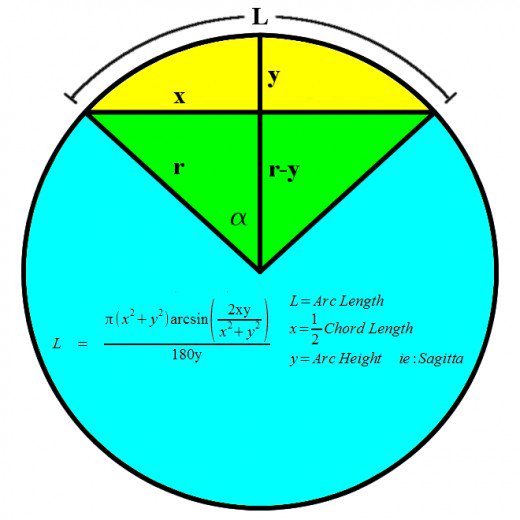
I did the math (hoping that “arcsin” was just SIN on my computer’s scientific calculator) and found a completely reasonable length of 70 inches (this is where I round because I don’t need to deal in decimals! That’s just TOO much!). So now I have 70 and I need it to be divisible by 6, so I increase it to 72 so that I can have 12 of the heart segments to make up the shawl. And now that I’ve gone through this I realize I’ve done the math wrong. I guess that doesn’t matter much since I also need to make it smaller after all. Oh me! I know I’m going back to the drawing board after all.
Back to math! Here’s a picture of my madness. Well half of it anyway. The other side of the envelope has the math on it. But we’ll leave this post at my madness.